

KnowHow
Free Technical Resources
In this section of Doulos Knowhow, we will give you an overview of OSVVM, and an example of using it. We've split this guide into the following parts:
Finally, we'll give you a simple downloadable example to help you get started.
OSVVM stands for "Open Source VHDL Verification Methodology". OSVVM is a set of VHDL packages, initially developed by Jim Lewis of Synthworks. OSVVM helps you adopt modern constrained random verification techniques using VHDL.
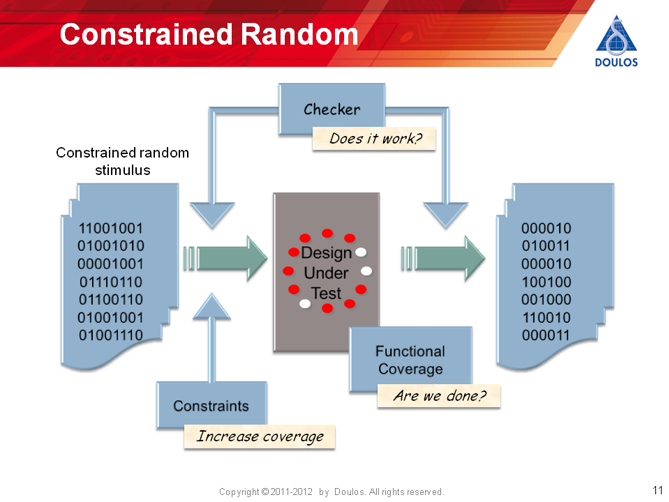
Constrained Random Verification (sometimes known as Testbench Automation) has become popular over recent years for complex verification environments. The basic idea of constrained random verification is to use randomization as the basis of your approach to verification. Traditional testing uses so-called "directed" tests - that is the person writing the test has to decide exactly what stimulus to apply. Constrained random verification uses randomized inputs. This has a number of benefits:
The main disadvantage of constrained random testing (which is also an advantage!) is that you need to have a self-checking testbench. The advantage is that a self-checking testbench is a good approach to verifying complex systems - but that requires that you have a reference model or some other means of generating the expected outputs of your design under test (DUT).
So far we have only talked about randomization. You may still be wondering about the word "constrained". It would not make much sense to generate completely random inputs to your DUT - the DUT would probably not do anything sensible. So in practice you are likely to use procedures to generate valid protocol cycles on the busses and inputs of your chip; and then constrain the data values to do useful things.
For instance, you might be testing a bus that allows reads and writes to slaves on the bus. You would generate bus cycles using procedures to follow the protocol timing of your bus, and then apply data constraints to disallow writes to a ROM, but allow both reads and writes to a RAM. You might also want to tune the distribution of addresses to stress particular aspects of your system.
Finally, with randomization of inputs, it becomes more difficult to figure out when all specification points have been tested. Perhaps more importantly, it becomes difficult to know what has not been tested. In a constrained random verification environment, this is solved by using functional coverage. Functional coverage measures something that relates back to particular specification points to tell you whether that specification point has been covered. Note that this is not the same as code coverage, which merely tells you if every line of code has been executed - but nothing about functionality. Even if every line of code has been executed, your DUT may not be correct! OSVVM provides a way of collecting the values of nodes in your verification environment to help you decide when verification is complete.
Here's a picture summarizing the Constrained Random approach:
If you have a recent version of a simulator that supports VHDL 2008, you may find that OSVVM is already included in the libraries supplied with your simulator.
Otherwise you can download OSVVM from osvvm.org - you need to create an account first.
By default the OSVVM code uses features of VHDL 2008, so you need to enable those in your simulator. If you must use VHDL 2002, then there is an application note on the OSVVM website explaining how to make the code compatible with VHDL 2002.
OSVVM makes extensive use of Protected Mode Types. As a user of the code, you do not really care - but it does mean that you must use at least VHDL 2002, as protected mode types were introduced in that version. OSVVM will not compile with VHDL 93.
If you want to install OSVVM yourself, follow these steps:
    library osvvm;
    use osvvm.RandomPkg.all;
    use osvvm.CoveragePkg.all;
First let's create some random values. To keep the example simple, we will use a combinational arithmetic and logic unit (ALU). The testbench will be clocked, but the design itself is purely combinational - this just means we don't have to worry about protocol timing. The example design is described here:
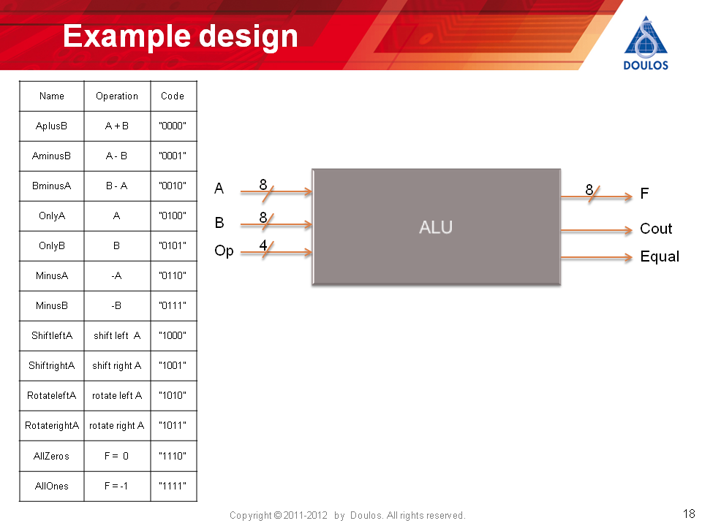
There is a 4 bit input Op representing the operation of the ALU, and two 8 bit inputs A and B.
Firstly, remember to make the appropriate packages visible - at the moment we will just use randomization, not coverage; but there's no harm making the coverage package visible as well:
library osvvm;
use osvvm.RandomPkg.all;
use osvvm.CoveragePkg.all;
Next, we declare variables of the appropriate type. Protected mode types behave a bit like classes in object-orientated languages, they allow data and functions to be mixed together in a single object. Variables of protected type may be shared, declared in a package or architecture for instance - but in this case, we will just declare them in the stimulus process:
                                                  -- Line number
  Stim: process                                   -- 1
    -- randomize the opcode                       -- 2
    variable RndOp : RandomPType;                 -- 3
    variable RndB : RandomPType;                  -- 4
    variable RndA : RandomPType;                  -- 5
    variable ncycles : natural;                   -- 6
    variable alldone : boolean;                   -- 7
    variable opInt : natural range 0 to 15;       -- 8
    variable AInt, BInt : natural range 0 to 255; -- 9
  begin                                           -- 10
 --   wait for 0 ns; -- make sure bins are added. -- 11
    RndOp.InitSeed(RndOp'instance_name);          -- 12
    RndA.InitSeed(RndA'instance_name);            -- 13
    RndB.InitSeed(RndB'instance_name);            -- 14
Lines 3, 4, and 5 declare three variables of type RandomPType, a protected type declared in the RandomPkg to represent randomized values. Lines 12, 13, and 14 show how you call a function or procedure that is part of the protected type - just use a '.', like it was a record. This function sets an initial seed. The seed is a string which is used to create initial values for the random number generator. It is convenient to create a unique seed at a particular point in the code hierarchy, and this can be done by using the 'INSTANCE_NAME attribute, which happens to return a string!
Next we create the random values:
                                             -- Line Number
    A  <= RndA.Randslv(0, 255, 8);           -- 1
    B  <= RndB.Randslv(0,255,8);             -- 2
Line 1 shows how to create a random std_logic_vector of length 8, with the full range of values 0 to 255 inclusive. Note that integers are used as the basis for randomization in OSVVM, even when using vectors - so you may need to do some manual work if you want to create random vectors longer than 32 bits.
The examples above generated values over the full range. However we might want to constrain the random item to particular ranges or values. Unlike languages such as SystemVerilog, VHDL does not have a constraint solver built-in - but the RandomPType does allow you to specify exactly which values you want generated, and their distribution.
Here's three options for generating the opcode values from our ALU example:
                                                               -- Line Number
    Op <= RndOp.Randslv(0, 15, 4);                             -- 1
    Op <= RndOp.Randslv( (0,1,2,4,5,6,7,8,9,10,11,14,15) ,4 ); -- 2
    Op <= RndOp.Randslv(0, 15, (3,12,13) ,4);                  -- 3
Line 1 shows the basic randomization over the full range of 0 to 15.
Line 2 shows how an integer vector may be used to specify just the values you want to generate. integer_vector is a type introduced in VHDL 2008.
Listing every required value like this is tedious, because all we really want to do is miss out (exclude) the values 3, 12, and 13. Line 3 shows the third form of the function, which allows an integer vector of excluded values to be used as the third argument.
The default randomization produces a uniform distribution of values. However the RandomPType has features to change the distribution. Here is a simple addition to the code which sets the distribution to Normal with a mean of 8 and a standard deviation of 3.
RndOp.setRandomParm(NORMAL, 8.0, 3.0);
There are many other options - again refer to the documentation supplied with the OSVVM download.
Just so you can see it really works, here is a graph of the values of Op after applying the distribution above.

The final missing piece in the jigsaw is functional coverage. Without functional coverage, you do not know what specfication points your random testing has covered; and more importantly, you do not know which points are not yet covered.
In functional coverage, the data item you are measuring is known as a coverpoint. The coverpoint has features which let you collate data values into bins. Let's look at an example of building a coverpoint to check the range of values produced for our inputs to the ALU.
                                              -- Line Number
  shared variable cp_B : covPType;            -- 1
-- ...                                        -- 2
begin                                         -- 3
                                              -- 4
  UUT: entity WORK.ALU(A1)                    -- 5
    port map (                                -- 6
      A     => A,  B     => B,                -- 7
      Op    => Op, F     => F,                -- 8
      Cout  => Cout, Equal => Equal);         -- 9
                                              -- 10
  --... stimulus goes here...                 -- 11
                                              -- 12
  InitCoverage: process                       -- 13
  begin                                       -- 14
    cp_B.AddBins(GenBin(1,254,8));            -- 15
    cp_B.AddBins(GenBin(0,0));                -- 16
    cp_B.AddBins(GenBin(255,255));            -- 17
    wait;                                     -- 18
  end process InitCoverage;                   -- 19
                                              -- 20
  Sample: process                             -- 21
  begin                                       -- 22
    loop                                      -- 23
      wait on Op;                             -- 24
      wait for 1 ns;                          -- 25
      cp_B.ICover(TO_INTEGER(UNSIGNED(B)));   -- 26
    end loop;                                 -- 27
  end process Sample;                         -- 28
                                              -- 29
  CoverReport: process                        -- 30
  begin                                       -- 31
    wait until STOP;                          -- 32
    report("B Coverage details");             -- 33
    cp_B.WriteBin;                            -- 34
    wait;                                     -- 35
  end process CoverReport;                    -- 36
Let's go through the code step-by-step. We are using three processes to setup, sample, and report coverage. The variable cp_B is declared in the architecture, so has to be declared shared. With shared variables you must be very careful to use them in a well-defined way. In the example, the Sample and CoverReport processes both have a wait statement at the top: this makes sure that the InitCoverage process runs first, and the bins for the coverpoint are created first, before the coverpoint is used.
Coverpoints sample integer values. In the InitCoverage process, lines 15 - 17 create 10 different bins. Line 15 takes the range 1 to 254 inclusive, and splits into 8 bins. Line 16 creates an individual bin for the value 0. Line 17 creates an individual bin for the value 255. Note that bins are specified as integer vectors, so one bin for the value 0 has to be written as (0,0).
In the Sample process, the coverage is sampled at line 26. Each time this line is executed, the value is examined and the bin counts updated as appropriate.
Finally the CoverReport process writes out the measured coverage data when the simulation stops (the Stop signal is set at the end of the stimulus process).
The results of this code are shown in the picture here:

The code excerpts above are included in the complete example you can download here. All you need is a simulator that supports OSVVM. The code example itself does not need VHDL 2008, but the OSVVM library needs either VHDL 2008 or VHDL 2002 support.
Click here to download the source files for this example. In exchange, we will ask you to enter some personal details. To read about how we use your details, click here. On the registration form, you will be asked whether you want us to send you further information concerning other Doulos products and services in the subject area concerned.
Go back to the VHDL main page.
Your e-mail comments are welcome - send email