This section contains a complete simple design to demonstrate the use of modules and processes in SystemC. For simplicity, it is very low level - not the style of coding you would normally expect in a system level design language!
The points demonstrated are:
- Creating hierarchy
- The sc_signal primitive channel
- (Specialized) ports
- Processes (SC_METHOD, SC_THREAD, SC_CTHREAD)
- A simple test bench
SystemC Background
Why look at Modules and Processes? The reason is that SystemC is intended to cope with both hardware and software, and to allow large systems to be modelled.
Processes are small pieces of code that run concurrently with other processes. Virtually all the high-level system level design (SLD) tools that have been developed use an underlying model of a network of processes. SystemC provides processes to support the construction of networks of independent (concurrent/parallel) pieces of code.
SLD needs to deal with large designs. To cope with this, it is common to use hierarchy. Hierarchy is implemented in SystemC by using the module, a class that can be linked to other modules using ports. Modules allow a piece of design to be worked on separately. Modules may contain processes, and instances of other modules.
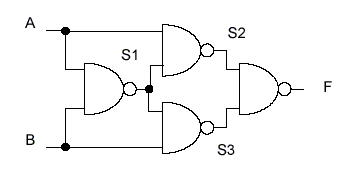
The Example Design
The design consists of an EXOR gate implemented with four NAND gates. Again, it is important to note that this is not a typical design style - but it is nice and simple to understand. The design looks like this:

The first step is to model the NAND gate. A NAND gate is a combinational circuit; its output is purely a function of the values at the input. It has no memory, and requires no clock. Because of this, the model can use the simplest kind of SystemC process, an SC_METHOD.
SC_METHODs are simply C++ functions. Because of that, the SystemC class library has to make them behave like processes. In particular:
- The SystemC class library contains a simulation kernel - a piece of code that models the passing of time, and calls functions to calculate their outputs whenever their inputs change.
- The function must be declared as an SC_METHOD and made sensitive to its inputs.
Here is the code for the NAND gate, in one file, nand.h
#include "systemc.h"
SC_MODULE(nand2)          // declare nand2 sc_module
{
  sc_in<bool> A, B;       // input signal ports
  sc_out<bool> F;         // output signal ports

  void do_nand2()         // a C++ function
  {
    F.write( !(A.read() && B.read()) );
  }

  SC_CTOR(nand2)          // constructor for nand2
  {
    SC_METHOD(do_nand2);  // register do_nand2 with kernel
    sensitive << A << B;  // sensitivity list
  }
};
Hierarchy in SystemC is created using a class sc_module. sc_module may be used directly, or may be "hidden" using the macro SC_MODULE. The example SC_MODULE above creates an sc_module class object called nand2.
Next are declared input and output ports. In general, a port is declared using the class sc_port. For instance, input ports using sc_signal would be declared
sc_port<sc_signal_in_if<bool>,1> A,B;
but as you can see, this is a lot of typing. For convenience, it is also possible to create and use specialized ports. sc_in is an example of a specialized port for the sc_signal class.
The ports may be of any C++ or SystemC type - the example uses bool, a built-in C++ type.
Next, the function that does the work is declared. The input and output (specialized) ports include methods read() and write() to allow reading and writing the ports. A and B are read, the NAND function is calculated, and the result is written to F using the write() method.
Note that you can often get away without using the read() and write() methods, as the = operator and the type conversion operators have been overloaded. So you could write
F = !(A && B);
but it is a good habit to use read() and write() as it helps the C++ compiler disambiguate expressions.
After the function do_nand2() is written, there is a constructor for the sc_module instance nand2. SystemC provides a shorthand way of doing this, using a macro SC_CTOR. The constructor does the following:
- Create hierarchy (none in this case)
- Register functions as processes with the simulation kernel
- Declare sensitivity lists for processes
It is also possible to initialize anything that required initialization here - for instance, a class data member could be initialized.
In the example above, the constructor declares that do_nand2 is an SC_METHOD, and says that any event on ports A and B must make the kernel run the function (and thus calculate a new value for F).
Hierarchy
The EXOR gate is built up from four copies (or instances) of the NAND gate. This is achieved by using the EXOR gate constructor to connect the NAND gate instances. Here is the code for the EXOR gate
#include "systemc.h"
#include "nand2.h"
SC_MODULE(exor2)
{
  sc_in<bool> A, B;
  sc_out<bool> F;

  nand2 n1, n2, n3, n4;

  sc_signal<bool> S1, S2, S3;

  SC_CTOR(exor2) : n1("N1"), n2("N2"), n3("N3"), n4("N4")
  {
    n1.A(A);
    n1.B(B);
    n1.F(S1);

    n2.A(A);
    n2.B(S1);
    n2.F(S2);

    n3.A(S1);
    n3.B(B);
    n3.F(S3);

    n4.A(S2);
    n4.B(S3);
    n4.F(F);
  }
};
The start looks very similar to the NAND gate, but note that it includes the file nand2.h. This allows access to the module containing the NAND gate.
The module exor2 is created, and ports are declared. Note that it is allowed to re-use the names A, B and F, as this is a different level of the hierarchy.
The original diagram shows some "pieces of wire" to connect the NAND gates. These are created by declaring sc_signals S1, S2 and S3. sc_signal is a class with a template parameter specifying the type of data the signal can hold - bool in this example. sc_signal is an example of a primitive channel, a built-in channel within the SystemC class library. It behaves like a signal in VHDL.
The constructor for the EXOR gate is more complex than that for the NAND gate, as it must have four instances of nand2. After the port declarations, four instances of nand2 are declared: n1, n2, n3 and n4. A label must be given to each instance. The four labels "N1","N2","N3" and "N4" are passed to the constructors of the instances of nand2 by using an initializer list on the constructor of exor2.
Finally, the ports are wired up. This is done in the constructor as shown.
Test bench
To test the design, there is a stimulus generator. This is another module, very similar to the above. The only significant point is that it uses a thread (SC_THREAD), a kind of process that can be suspended. Here is the code for stim.h
#include "systemc.h"
SC_MODULE(stim)
{
  sc_out<bool> A, B;
  sc_in<bool> Clk;

  void StimGen()
  {
    A.write(false);
    B.write(false);
    wait();
    A.write(false);
    B.write(true);
    wait();
    A.write(true);
    B.write(false);
    wait();
    A.write(true);
    B.write(true);
    wait();
    sc_stop();
  }
  SC_CTOR(stim)
  {
    SC_THREAD(StimGen);
    sensitive << Clk.pos();
  }
};
Note the final call to sc_stop() which makes the simulation stop. The monitor code looks very similar, and is omitted - it is in a file mon.h.
Here is the top level - it is inside a file main.cpp that includes all the submodules described above
#include "systemc.h"
#include "stim.h"
#include "exor2.h"
#include "mon.h"

int sc_main(int argc, char* argv[])
{
  sc_signal<bool> ASig, BSig, FSig;
  sc_clock TestClk("TestClock", 10, SC_NS,0.5);

  stim Stim1("Stimulus");
  Stim1.A(ASig);
  Stim1.B(BSig);
  Stim1.Clk(TestClk);

  exor2 DUT("exor2");
  DUT.A(ASig);
  DUT.B(BSig);
  DUT.F(FSig);

  mon Monitor1("Monitor");
  Monitor1.A(ASig);
  Monitor1.B(BSig);
  Monitor1.F(FSig);
  Monitor1.Clk(TestClk);

  sc_start();  // run forever

  return 0;

}
The header files for the modules are included, top-level signals declared to do the wiring, and a clock created using sc_clock; then each module is instanced and connected.
After that, calling sc_start() starts the simulation and it runs forever (or rather until it encounters the call to sc_stop() in the stimulus module).
Here is the output from this example
      Time A B F
       0 s 0 0 1
     10 ns 0 0 0
     20 ns 0 1 1
     30 ns 1 0 1
     40 ns 1 1 0
If you look at it, you will notice something very odd - the first line at time 0 says that F is 1 (true), while A and B are 0 - not a very convincing EXOR gate! By 10 ns, everything is as it should be. What is going on at time 0?
Simulation
The SystemC library contains a simulation kernel. This decides which processes (software threads) to run. At time 0, all SC_METHODs and SC_THREADs will run in an undefined order, until they suspend. Then SC_CTHREADs will run when a clock edge occurs.
The problem above is due to a combination of circumstances:
- The sc_clock statement results in a rising edge at time 0, so both the monitor and stimulus processes will run (in an undefined order, it is not known which will run first).
- Variables in C++ do not always have a defined initial value (unless they are declared static). So the data value held by F happens to be starting at 1 (true).
- The do_nand2 SC_METHOD runs at time 0, and schedules F to update, but F is a signal, which cannot update instantaneously, so the value 1 is still present when the monitor process runs.
To prove this is the case, it is possible to modify the sc_clock statement to delay the first edge of the clock, as follows
sc_clock TestClk("TestClock", 10, SC_NS,0.5, 1, SC_NS);
The final 1, SC_NS arguments specify a 1 ns delay before the first clock edge occurs. Now time has passed, so F will be updated. Here is the corresponding output
      Time A B F
      1 ns 0 0 0
     11 ns 0 0 0
     21 ns 0 1 1
     31 ns 1 0 1
     41 ns 1 1 0
Now you can see that F is always correct.
Conclusions
That concludes a quick tour of modules and processes. You have seen the importance of understanding the concurrent nature of the SystemC simulation kernel, together with the behaviour of the sc_signal primitive channel.
You have also seen some basic examples of instancing lower level modules within a top-level module, and how sc_main is used.
Prev Next