Version 2016-04-18
Key Concepts
Installing the Code Generator
Running the Code Generator
Interface Template File
Register Template File
Common Template File
Common Template File - Reference Model and Scoreboard
Common Template File - Acceleration/Emulation-Ready Environments
Pin List File
Generated Structure
Compilation and Simulation
Adding a User-Defined Sequence
Adding a User-Defined Register Sequence
Clocks and Resets
Making Minimal Extensions to the Generated Code
Including Code Before, Inside, and After Classes
Key Concepts
You should understand these concepts before diving into the detail.
☆ Use Models
There are three possible use models for the code generator (see Tutorial Part 1: Getting Started):
- Simply as a learning aid, generating and running working examples of UVM code.
- To generate the first version of your production code, after which the production code is maintained by hand and the code generator not run again.
- To generate and regenerate the boilerplate code within your production code as the project proceeds, postponing for as long as possible the point when you need to start maintaining the boilerplate code by hand.
☆ Inputs and Outputs
The way the code generator works is to take a set of template files, include files, and the DUT code as inputs, and to generate a set of SystemVerilog source files and simulator scripts as outputs, overwriting any previously generated files.
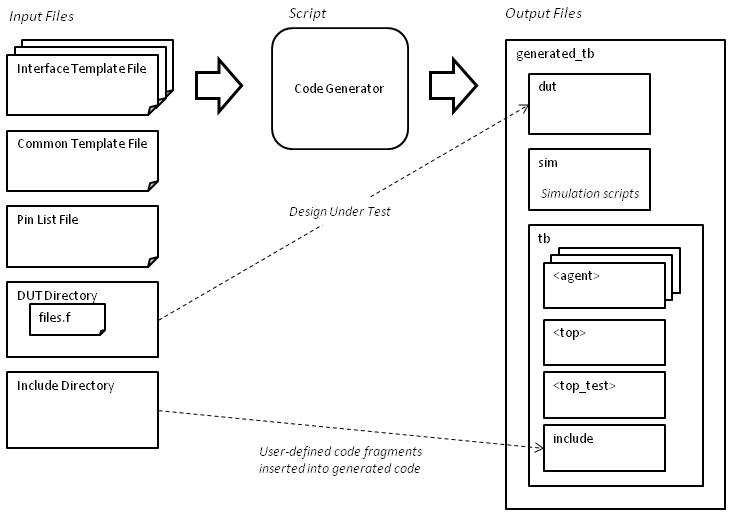
Figure: Inputs and Outputs
☆ References to External Files
The output files will be self-contained except for any SystemVerilog packages referenced from the input files and for any files referenced from `include directives in the input files. Referenced packages and included files will not be copied to the output file set unless they are explicitly present in the input file set. So import declarations and `include directives are opaque - the code generator simply copies the declaration/directive, not the associated files. Thus the generated code can reference external files and packages, including the UVM package itself.
☆ Interface Template Files
Each interface template file defines a single type set, literally a set of SystemVerilog classes in a package (representing UVM agent, sequence, configuration, env, and so forth) and a SystemVerilog interface. An interface template file can also specify information relating to how that agent is instantiated in a single env (i.e. the number of instances, whether the agent is active or passive, and the location of the corresponding address map in the register model). Instead of the agent being instantiated in its own env, it is also possible to instantiate the generated agent from another env, or from the top-level env (see Interface Template File).
☆ Other Template Files
In additional to the interface template files, there is a common template file that specifies settings that apply equally to all agents or that apply to the top-level modules, top-level env, and test (see Common Template File). There is also a dut_pfile that specifies the pin-level connections between the generated interface instances and the DUT (see Pin List File).
☆ Modifying the Generated Code
The interface and common template files provide ways of inserting user-defined code fragments from include files into the generated code, and ways of suppressing automatic code generation at specific points in the code. These user-defined fragments can be inserted inline or inserted using `include directives. Either way, the user-defined code fragments do form part of the output file set (unlike `include directives in the input source code, which are opaque).
Since the output file set is overwritten each time the code generator is run, care needs to be taken to make sure that any changes made to the output file set are not lost. There are two good approaches:
- Use settings in the template files to modify the generated code.
- Write a script that makes any necessary edits to the generated file set immediately after running the code generator.
☆ Differentiating Multiple Instances
Any settings given in an interface template file, including any user-defined code fragments, will affect the generated classes (the type set), and will thus apply equally to all objects of those types. Multiple instances of a given type set will be symmetrical, including the default sequences started on the agents. Furthermore, any factory overrides subsequently applied to those sequences (replacing one sequence with another) will be applied symmetrically to all instances, because sequence factory overrides are always type overrides (whereas UVM components can be differentiated using factory instance overrides). The only obvious way to differentiate multiple instances of the same sequence class is by assigning instance-specific information within the top-level configuration object, which can then be read by the sequence objects.
If you need multiple instances of the same agent/interface that are identical or near-identical, the best approach is to use the number_of_instances setting. If you need multiple instances of the same agent/interface that are highly differentiated (or used in different contexts), the best approach is to define a separate interface template file for each.
Back to the top.
Installing the Code Generator
The code generator consists of a single Perl script easier_uvm_gen.pl.
You need to have Perl 5.8.0 or later installed along with the modules File::Copy::Recursive, File::stat, and Time::Piece modules. You can check whether these modules are installed by typing the following commands:
perl -MFile::Copy::Recursive -e 1
perl -MFile::stat -e 1
If the module is installed the command should complete silently. If the module is not installed you will see an error message, in which case you can install it by running the following command as root:
perl -MCPAN -e 'install File::Copy::Recursive'
perl -MCPAN -e 'install File::stat'
Early versions of the Code Generator prior to version 2015-06 also required the following, but it is no longer necessary:
perl -MCPAN -e 'install Time::Piece'
Back to the top.
Running the Code Generator
The code generator script can be run as follows:
perl easier_uvm_gen.pl [-t] <template> <template> ...
Each of the command line switches listed below is optional.
- t <template> lists the interface template files. While there must be one or more template files named on the command line, the -t switch itself is optional. The recommended convention is for template files to have the extension .tpl, but the script will actually accept any filename.
- p <top> specifies the prefix used when constructing the names of the files, module, package, and UVM classes associated with the top-level verification environment. The prefix can also be specified using the setting prefix in the common template file. The default is top.
- m <filename> specifies the path of the common template file relative to the current directory. The default is common.tpl.
- s <path> specifies the path of the Syosil scoreboard source files. This command line switch overrides the value of the setting syosil_scoreboard_src_path in the common template file. [2016-03-08]
- c causes the code generator to continue after a warning is issued. By default the code generator issues a Continue? (y/n) prompt after a warning.
- nopack suppresses the automatic generation of do_pack and do_unpack methods within the uvm_sequence_item class. This is for backward compatibility with previous versions of the code generator script which did not generate these methods.
- h prints this list of command line switches and takes no other action.
You will find the generated files in the directory <project>/tb, as specified in the common template file (see below). Depending on the settings in the template files given on the command line, the top-level environment <top>_env may instantiate lower-level UVM envs or agents and a configuration object for each. Any lower-level envs instantiate agents, coverage collector components, and register models. Each agent instantiates a sequencer, driver, and monitor. Alongside the UVM component hierarchy, the code generator creates an example UVM test that runs a simple sequence on each agent.
Each run of the code generator script generates a complete set of files below the <project> directory. These files will be self-contained unless the user-supplied code (consisting of the DUT and any verification environment include files) happen to contain any nested `include directives that reference external files, in which case those external files will not be copied to the <project> directory. You should not modify the generated code if you intend to regenerate it later, because any modifications will be overwritten when the generator is re-run. Instead, the generator contains a mechanism (described below) to insert user-defined code into the generated code.
Back to the top.
Interface Template File
There must be one template file for each DUT interface. The template file defines the specific variables and options for that interface and for the corresponding UVM agent and its transaction. Each template file has the following format:
Any line starting with a # character is treated as a comment and ignored. End-of-line comments are allowed.
When the value to the right of = consists of more than one item, the items can be separated by commas or by spaces.
The order of the lines in the template file is mostly unimportant.
agent_name = <agent>
The agent_name is used to construct the names of all UVM classes and variables associated with a particular agent. agent_name should be the first setting in the template file.
trans_item = <name>
The trans_item is used as the class name of the transaction (sequence item) used by the agent: the same transaction type is used as the sequence item and as the analysis transaction.
number_of_instances = <integer>
If present, number_of_instances specifies the number of instances of the given agent/interface. The default is 1. If agent_has_env = no, these agent instances will be generated in the top-level env. Otherwise, they will be in the agent env. In the dut_pfile, multiple instances of the same interface should be differentiated using the suffix _0, _1, _2, ...
For an agent/interface with a register model, the agent will anyway be contained in its own env. The register sub-block associated with the agent must have the suffix _0, _1, ... to its instance name in the top-level register block. The name of the associated map in the top-level register block must have the same suffix. The generated sequence <agent>_env_default_seq will have members regmodel_0, regmodel_1, ... (i.e. the same suffix) to be used for calls to read/write registers from a register sequence.
trans_var  = <declaration>
trans_var  = <declaration>
...
Each trans_var declaration will be included in the generated transaction (sequence item) class. Each variable so declared will be included in the generated do_copy, do_compare, do_print, do_record, do_pack, do_unpack, and convert2string methods of that class. Each <declaration> can be a complete class property (variable) declaration or a comment, e.g. rand logic [7:0] data; A trans_var is also allowed to define a user-defined type (typedef) or a const or static class property, which will not be copied or compared by the generated do_copy and do_compare methods. For example:
trans_var = typedef byte unsigned ubyte;
trans_var = rand ubyte data;
trans_var = const ubyte zero = 0;
trans_var = static int count;
The formatting of the trans_var items is preserved as as they are copied from the template file to the generated code, so you may wish to vertically align variable names and/or initial values in the template file. The variables will be packed and unpacked in the order in which the trans_vars are given.
trans_enum_var = <declaration>                                                   [2015-11]
trans_enum_var = <declaration>
...
To be used instead of trans_var for variables of an enumeration type, for example:
trans_enum_var = typedef enum {up, down} dir_t;
trans_enum_var = rand dir_t dir;
Note that the enumeration type must be defined separately with a typedef, not defined as part of the variable definition. The typedef can be given as a trans_var or a trans_enum_var. It is necessary to distinguish enumeration from non-enumeration variables within the generated do_pack and do_unpack methods, the corollary being that it is not necessary to distinguish enumeration variables if you suppress the generation of these methods using the -nopack command line switch. The generated convert2string method takes advantage trans_var_enum by converting to the enumeration value, but this is not strictly necessary (trans_var values are formatted as integers).
trans_meta      = <declaration>                                                  [2015-11]
...
trans_enum_meta = <declaration>                                                  [2015-11]
...
Each trans_meta and trans_enum_meta declaration will be included in the generated transaction (uvm_sequence_item) class but the variables so declared will not be included within the generated do_compare, do_pack, and do_unpack methods. These variables represent metadata that is present in each transaction object but does not represent data sent to and from the DUT. The setting trans_enum_meta is only relevant to convert2string since metadata anyway does not get packed and unpacked. In other words, the only difference between trans_meta and trans_enum_meta is how the value of the variable is formatted by the generated convert2string method. A typedef can be given as a trans_var, a trans_enum_var, a trans_meta, or as a trans_enum_meta, the only difference being in the resultant declaration ordering within the transaction class.
The settings trans_var, trans_enum_var, trans_meta, and trans_enum_meta each allow any number of packed array dimensions and a single unpacked array dimension. The unpacked dimension must be specified as a size as opposed to a range. All dimensions may be given as expressions involving parameter names. For example:
trans_var       = rand bit [7:0][7:0] square;    # Two packed dimensions
trans_var       = rand int unsigned table [16];  # One unpacked dimension        [2015-11]

trans_enum_meta = typedef enum logic [1:0] {red, green, blue} color_t;           [2015-11]
trans_enum_meta = color_t [N-1:0][N-1:0] lookup [M];                             [2015-11]
The UVM macros for packing and unpacking fields do not support arrays of enumeration type. Because of this, trans_enum_var does not allow an unpacked array dimension if the do_pack and do_unpack methods are being generated. (trans_enum_meta works above because metadata is anyway not included in the do_pack/unpack methods.)
Unpacked arrays are not included in the automatically generated transaction covergroup.
trans_var_constraint = <constraint_block>
trans_var_constraint = <constraint_block>
...
If present, each trans_var_constraint specifies a constraint block, which will be included as a constraint within the transaction (sequence item) class, e.g.
trans_var_constraint = { addr < data; data < 55; }
trans_var_constraint = { solve cmd before data; cmd < data; }
Alternatively, constraints can be specified using trans_var. This has the advantage that constraints can be named explicitly, for example:
trans_var = constraint addr_lt_data    { addr < data; data < 55; }
trans_var = constraint cmd_before_data { solve cmd before data; cmd < data; }
config_var  = <declaration>
config_var  = <declaration>
...
Each config_var declaration will be included in the generated agent configuration class. config_var can also be used in the common template file to add declarations to the top-level configuration class. See agent_copy_config_vars. As for trans_var, each <declaration> can be a complete class property (variable) declaration, a typedef, a constraint, or a comment, for example:
config_var = // Configuration variable specified in interface template file
config_var = int count = 4;
(config_var can also be used in the common template file to add declarations to the top-level configuration class.)
if_port     = <variable_declaration>
if_port     = <variable_declaration>
...
Each if_port must be a complete declaration suitable for inclusion within a SystemVerilog interface, for example:
if_port     = parameter AW = 4;
if_port     = parameter DW = 4;
if_port     = logic          clock;
if_port     = logic          enable;
if_port     = logic [AW-1:0] addr;
if_port     = logic [DW-1:0] data;
These declarations will be included in the interface associated with this agent. Note that it is possible to incorporate parameters, and thus to define parameterized interfaces, although truly parameterized interfaces require special treatment. There will usually be some relationship between the trans_vars and the if_ports, as defined by the behavior of the UVM driver and monitor components, but this relationship need not be one-to-one. The driver and monitor components will use the variables of the transaction object when driving and sensing the variables of the interface.
The formatting of the if_port items is preserved as as they are copied from the template file to the generated code, so you may wish to vertically align variable names and/or initial values in the template file.
if_clock    = <name>
...
if_reset    = <name>
...
If present, if_clock and if_reset are used to identify the clock and reset variables of the interface, respectively, which must also be declared as if_ports. Note that unlike if_port, these settings must specify variables names rather than complete variable declarations. The only significant effect of these two settings is to generate assignments to the specified clock and reset variables, respectively, from the automatically generated clock and reset generation code. These settings have no effect if generate_interface_instance = no in the interface template file (see below) or if th_generate_clock_and_reset = no in the common template file; in either case the user would be responsible for connecting clock and reset code in the test harness to clock and reset variables in the interface, if such connections are required. if_clock and if_reset can be thought of as convenience features for automatically connecting clocks and resets to interfaces in simple cases where the default generated code is adequate.
generate_interface_instance = <yes or no> [2016-04-18]
generate_interface_instance can be set to yes or no. The value is not case sensitive. The default is yes, which means that a SystemVerilog interface instance will be generated for the interface specified in the current template file, or multiple interface instances if number_of_instances is greater than 1. The interface instance is placed in the generated test harness module. generate_interface_instance = no allows you to provide a user-defined instantiation of a parameterized interface that overrides the default parameter values.
If generate_interface_instance = no then no interface instance will be generated from the current template file, and the user should include their own interface instantiation by using the setting th_inc_inside_module. Any if_clock or if_reset settings in the current interface template file will be ignored, so the user should include their own code to connect any clock and reset signals to their own interface instantiation. Since an interface is not being instantiated automatically, the virtual interface in the corresponding configuration object will not be assigned. This leaves two possibilities: either assign the virtual interface with a user-defined code fragment (tb_inc_before_run_test is a suitable setting) or do not access the virtual interfaces in the UVM driver or monitor (since they will be null).
byo_interface = <interface_name> [2016-04-18]
If present, byo_interface specifies the name of a BYO (or Bring Your Own) SystemVerilog interface. In other words, instead of instantiating the automatically generated interface, the generated test harness module instantiates the named interface, which must be provided by the user. The <interface_name> should not be <agent>_if or the name would clash with that of the automatically generated interface. The source file that contains the interface can be made available as part of the DUT code using the dut_source_path. The byo_interface setting can be used with generate_interface_instance = yes (the default) or generate_interface_instance = no.
With byo_interface and generate_interface_instance = yes (the default), the generated interface instance names are as per the default, that is, <agent>_if_<suffix>. The if_clock and if_reset settings can be used to connect automatically generated clocks and resets to the interface instance. Virtual interfaces in the configuration object, driver, and monitor are generated and set automatically, and their type is changed to virtual <interface_name> so they can refer to the BYO interface instance.
With byo_interface and generate_interface_instance = no, the interface instance names are user-defined. The if_clock and if_reset settings are ignored. Virtual interfaces in the configuration object, driver, and monitor will not be assigned automatically (because the interface instance names are unknown), but can be assigned in a user-supplied code fragment (tb_inc_before_run_test is a suitable setting).
A parameterized interface has to be instantiated manually (generate_interface_instance = no). A parameterized interface can be a BYO interface, but it does not have to be. It is possible to generate a parameterized interface from an interface template file.
uvm_seqr_class = <yes or no>
uvm_seqr_class can be set to yes or no. The value is not case sensitive. The default is no, which means that the sequencer type for that specific agent is defined using a typedef, e.g.
typedef uvm_sequencer #(<trans_item>) <agent>_sequencer;
If the value is yes, then an explicit class is generated, e.g.
class <agent>_sequencer extends uvm_sequencer #(<trans_item>); ... endclass
agent_is_active = <UVM_ACTIVE or UVM_PASSIVE>
agent_is_active can be set to UVM_ACTIVE or UVM_PASSIVE, which determines whether the agent is run in active or passive mode by setting the flag in the configuration object of the agent accordingly. The default is UVM_ACTIVE. The configuration object is created and the flag set in the top-level environment <top>_env.
agent_checks_enable = <yes or no>
agent_checks_enable can be set to yes or no. The value is not case sensitive. The default is yes. This setting determines the value of the checks_enable flag within the configuration object of this agent and should be used within user-defined code fragments to enable or disable checks.
agent_coverage_enable = <yes or no>
agent_coverage_enable can be set to yes or no. The value is not case sensitive. The default is yes. This setting determines the value of the coverage_enable flag within the configuration object of this agent and should be used within user-defined code fragments to enable or disable coverage collection. If set to no, the coverage subscriber component for this agent will not be instantiated.
agent_has_env = <yes or no>
agent_has_env can be set to yes or no. The value is not case sensitive. The default is no, which means that the agent is instantiated directly in the top-level env (or inside the env of another agent - see additional_agent). If the value is yes, the agent is instantiated within its own environment <agent>_env, which is itself instantiated with the top-level environment <top>_env. As well as determining the hierarchical structure of the verification environment, this flag also determines the structure of the sequences created by the generator (see below). agent_has_env
CAVEAT. An agent that is used with a register model will always have an env, and so setting agent_has_env = no would have no effect for such an agent.
additional_agent = <agent>
additional_agent = <agent>
...
If present, each additional_agent defines an agent that will be instantiated within the environment of the current agent, assuming agent_has_env = yes. If agent_has_env = no, specifying additional agents has no effect. An agent must not name itself as an additional agent.
CAVEAT. As implemented in the current version of the code generator, additional_agent has many restrictions, as follows:
- A template file that specifies an additional_agent must also specify agent_has_env = yes.
- additional_agent and reg_access_name are mutually exclusive, that is, additional_agent should not be used for an agent that has a register model: Doing so would mean that the additional agent in question would not be instantiated (unless it is instantiated in its own env).
- An agent that appears as an additional agent should not itself have agent_has_env = yes (otherwise it will be instantiated twice, in its own env and as an additional agent in another env).
- Any specific agent should not appear as an additional_agent more than once, whether in a single interface template file or in multiple interface template files.
- An agent that appears as an additional_agent must itself have number_of_instances = 1 (the default).
The following settings enable or suppress the automatic generation of certain methods inside or immediately after the corresponding class. The default is yes in every case. Suppressing the automatic generation of methods allows those methods to be user-defined.
trans_generate_methods_inside_class        = <yes or no>
trans_generate_methods_after_class         = <yes or no>
If no, suppresses the generation of the do_copy, do_compare, do_print, do_record, and convert2string methods of the transaction (sequence item) class.
agent_generate_methods_inside_class        = <yes or no>
agent_generate_methods_after_class         = <yes or no>
If no, suppresses the generation of the build_phase and connect_phase methods of the agent class.
agent_env_generate_methods_inside_class    = <yes or no>
agent_env_generate_methods_after_class     = <yes or no>
If no, suppresses the generation of the build_phase and connect_phase methods of the agent env class (not the top-level env, which can be controlled from the common template file).
agent_config_generate_methods_inside_class = <yes or no>                    [2016-02-19]
agent_config_generate_methods_after_class  = <yes or no>
If no, suppresses the generation of the new method of the agent configuration (uvm_object) class. If no, you must provide a constructor in an include file using the setting agent_config_inc_inside_class and/or agent_config_inc_after_class.
agent_cover_generate_methods_inside_class  = <yes or no>
agent_cover_generate_methods_after_class   = <yes or no>
If no, suppresses the generation of the new, write, and report_phase methods and covergroup m_cov of the agent coverage (subscriber) class. If no, you must provide a constructor in an include file using the setting agent_cover_inc_inside_class and/or agent_cover_inc_after_class.
reg_cover_generate_methods_inside_class    = <yes or no>
reg_cover_generate_methods_after_class     = <yes or no>
If no, suppresses the generation of the new, write, and report_phase methods and covergroup m_cov of the agent env coverage (subscriber) class. If no, you must provide a constructor in an include file.
adapter_generate_methods_inside_class      = <yes or no>                    [2016-02-19]
adapter_generate_methods_after_class       = <yes or no>
If no, suppresses the generation of the reg2bus and bus2reg methods of the register adapter (uvm_reg_adapter) class. If no, you must provide the methods in an include file.
driver_inc                        = <filename> [inline]
monitor_inc                       = <filename> [inline]
agent_cover_inc                   = <filename> [inline]
reg_cover_inc                     = <filename> [inline]
driver_inc, monitor_inc, agent_cover_inc, and reg_cover_inc offer a convenient way for beginners to get started in that they require the user to provide the minimum of user-defined code. They are described below in the section Extending the Generated Code. The following settings provide more flexibility.
The following settings specify the names of include files for inserting user-defined code within automatically generated code. Each setting does nothing except insert some code, so these settings can be freely combined with other settings. By default, each setting generates one `include directive. If inline is given as a second parameter, the user-defined code is copied inline instead of being included using an `include directive. With or without inline, the included files are copied to the <project>/tb/include directory. Any files referenced by nested `include directives will not be copied to the <project>/tb/include directory.
if_inc_inside_interface = <filename> [inline]
Include user-defined code from the given file in the generated interface.
trans_inc_before_class            = <filename> [inline]
trans_inc_inside_class            = <filename> [inline]
trans_inc_after_class             = <filename> [inline]
Include user-defined code from the given file in the generated transaction (sequence item) class.
agent_inc_before_class            = <filename> [inline]
agent_inc_inside_class            = <filename> [inline]
agent_inc_after_class             = <filename> [inline]
Include user-defined code from the given file in the generated agent class.
agent_prepend_to_build_phase      = <filename> [inline]
agent_append_to_build_phase       = <filename> [inline]
agent_append_to_connect_phase     = <filename> [inline]
Include user-defined code from the given file in the build_phase or connect_phase methods of the generated agent class. Requires agent_generate_methods_after_class = yes (which is the default).
sequencer_inc_before_class        = <filename> [inline]
sequencer_inc_inside_class        = <filename> [inline]
sequencer_inc_after_class         = <filename> [inline]
Include user-defined code from the given file in the generated sequencer class. Requires uvm_seqr_class = yes.
driver_inc_before_class           = <filename> [inline]
driver_inc_inside_class           = <filename> [inline]
driver_inc_after_class            = <filename> [inline]
Include user-defined code from the given file in the generated driver class. Operates independently from driver_inc.
monitor_inc_before_class          = <filename> [inline]
monitor_inc_inside_class          = <filename> [inline]
monitor_inc_after_class           = <filename> [inline]
Include user-defined code from the given file in the generated monitor class. Operates independently from monitor_inc.
agent_cover_inc_before_class      = <filename> [inline]
agent_cover_inc_inside_class      = <filename> [inline]
agent_cover_inc_after_class       = <filename> [inline]
Include user-defined code from the given file in the generated agent coverage (subscriber) class. Operates independently from agent_cover_inc.
agent_config_inc_before_class     = <filename> [inline]
agent_config_inc_inside_class     = <filename> [inline]
agent_config_inc_after_class      = <filename> [inline]
Include user-defined code from the given file in the generated agent configuration class (not the top-level configuration class, which can be controlled from the common template file).
agent_copy_config_vars = <filename> [inline]
Include user-defined code from the given file in the build_phase method of the generated top-level env class in order to copy any user-defined configuration variables from the top-level configuration object (see config_var in the common template file) to the agent configuration object (see config_var in the interface template file). agent_copy_config_vars is primarily intended for use with nested_config_objects = no, which is the default. It does work with nested_config_objects = yes, although it is not usually necessary because there is less need to copy variables between configuration objects when they are nested.
If number_of_instances is greater than 1, the given file will only be included once and may contain assignments for multiple instances of the configuration object corresponding to multiple instances of the agent. For example:
// m_config is a reference to the top-level configuration object
// m_agent_0_config and m_agent_1_config are references to two agent configuration objects
// There are two config_vars n_0 and n_1 in the top-level configuration object
// and one config_var n in the agent configuration object, of which there are two instances

m_agent_0_config.n = m_config.n_0;
m_agent_1_config.n = m_config.n_1;
agent_env_inc_before_class        = <filename> [inline]
agent_env_inc_inside_class        = <filename> [inline]
agent_env_inc_after_class         = <filename> [inline]
Include user-defined code from the given file in the generated agent env class (not the top-level env class, which can be controlled from the common template file).
agent_env_prepend_to_build_phase  = <filename> [inline]
agent_env_append_to_build_phase   = <filename> [inline]
agent_env_append_to_connect_phase = <filename> [inline]
Include user-defined code from the given file in the build_phase or connect_phase methods of the generated agent env class. Requires agent_env_generate_methods_after_class = yes (which is the default).
reg_cover_inc_before_class        = <filename> [inline]
reg_cover_inc_inside_class        = <filename> [inline]
reg_cover_inc_after_class         = <filename> [inline]
Include user-defined code from the given file in the generated agent env coverage (subscriber) class.
adapter_inc_before_class          = <filename> [inline]                     [2016-02-19]
adapter_inc_inside_class          = <filename> [inline]
adapter_inc_after_class           = <filename> [inline]
Include user-defined code from the given file in the generated register adapter class.
agent_seq_inc = <filename> [inline]
Include user-defined code from the given file at the end of the file <agent>_seq_lib.sv that contains <agent>_default_seq.
agent_env_seq_inc                 = <filename> [inline]
reg_seq_inc                       = <filename> [inline]
Include user-defined code from the given file at the end of the file <agent>_env_seq_lib.sv that contains <agent>_env_default_seq. (reg_seq_inc is an alias for agent_env_seq_inc, retained for backward compatibility.)
agent_factory_set = <original-classname> <replacement-classname>
Generates a call to set_type_override in the build_phase method of the <top>_test class. Can be used with agent_seq_inc or agent_env_seq_inc to replace a default sequence with a user-defined sequence. top_factory_set and agent_factory_set have identical behavior since both do a factory overrride by type. agent_seq_inc, agent_env_seq_inc, req_seq_inc, and agent_factory_set are described in more detail in the sections Adding a User-Defined Sequence and Adding a User-Defined Register Sequence below.
reg_access_name = <agent> <mode> [Deprecated in 2015-06-29]
<agent> must be the name of the agent, the same name as given by agent_name.
<mode> must be WR (write/read), WO (write only), or RO (read only).
reg_access_name is deprecated and has been replaced by reg_access_mode.
reg_access_mode = <mode>
Specifies that the agent will be connected to a register model and that user-defined register sequences may access registers with the given mode. <mode> can be WR (write/read), WO (write only), or RO (read only). The actual value of <mode> is relevant to the code generated within the uvm_reg_adapter. (Replaces reg_access_name.)
reg_access_map = <map>
Specifies the name of the variable that represents the root address map used to access registers through this agent. Each agent used for register access must be connected to a distinct root map in the root (top-level) uvm_reg_block class of the register model, regardless of where the registers themselves are located in the register model. The generated code connects this map to the associated adapter, predictor, and sequencer. The default is <agent>_map (for backward compatibility with earlier versions of the code generator). If number_of_instances is greater than 1, the map variable names are distinguished by adding the suffix _0, _1, _2, ..., though this will be handled differently in future versions.
reg_access_block_instance = <instance>
Specifies the object path of the uvm_reg_block instance in the register model that will be used as the root when accessing registers from a register sequence, that is, the register block referred to be the regmodel variables of the generated config, env, coverage, and sequence classes associated with the agent. This value is only relevant to how registers in the register model are accessed from sequences; it is not relevant to the value of the reg_access_map (which is always in the top-level register block). Setting reg_access_block_instance to something other than the top-level register model allows register sequences to access registers independently from their hierarchical location within the register model. The object path can be hierarchical, and can be specified with or without the leading dot (period) character. The default is <agent> (for backward compatibility with earlier versions of the code generator). If number_of_instances is greater than 1, the instance variable names are distinguished by adding the suffix _0, _1, _2, ..., though this will be handled differently in future versions.
For example:
reg_access_block_instance = a.b.c
A register access from a register sequence would take the form:
regmodel.<register_name>.write(...);
regmodel.<register_name>.read(...);
where regmodel is a reference to the instance <top-level-regmodel>.a.b.c. Alternatively, the instance name can be set to null as follows:
reg_access_block_instance =
in which case any register access from a register sequence would need to be an absolute reference from the top-level register model:
regmodel.a.b.c.<register_name>.write(...);
regmodel.a.b.c.<register_name>.read(...);
reg_access_block_type = <type>
Specifies the type of the uvm_reg_block class as selected by reg_access_block_instance. This is used by the code generator as the type of the local regmodel variables that appear within generated config, env, coverage, and sequence classes. If reg_access_block_instance is null, reg_access_block_type must specify the type of the top-level register block. If reg_access_block_instance is omitted, reg_access_block_type must specify the type of a variable named <agent> within the top-level register block (for backward compatibility with earlier versions of the code generator).
uvm_reg_kind = <kind>
uvm_reg_addr = <addr>
uvm_reg_data = <data>
<kind> must be the name of the trans_var that represents the access kind (0 = read, 1 = write).
<addr> must be the name of the trans_var that represents the address for the register read/write.
<data> must be the name of the trans_var that represents the data for the register read/write.
See the section Register Template File immediately below.
Back to the top.
Register Template File
The register template file is deprecated. DO NOT USE THE REGISTER TEMPLATE FILE! The capabilities provided by this file can be achieved instead by using settings in the interface and common template files.
perl easier_uvm_gen.pl if1.tpl if2.tpl if3.tpl reg.tpl
The register model itself must be provided in the file given by regmodel_file (default regmodel.sv) in the directory from which the script is run. The script does not generate the register model: It must be generated separately (or written by hand).
The reg.tpl file is used to identify the names and structure of the register blocks in the register model. The top-level register block will be instantiated in the top-level env, and each lower-level register block will be instantiated in the env of the agent to which its address map is connected. reg.tpl must be formatted as follows:
regmodel_name      = <top-level-register-block-classname>
regmodel_file      = <register-model-filename>
regmodel_sub_block = <register-sub-block-classname>  <instance/agent-name>
regmodel_sub_block = <register-sub-block-classname>  <instance/agent-name>
...
In [2015-06-29] these settings were replaced as follows:
regmodel_name        replaced by top_reg_block_type in the common template file
regmodel_file        replaced by regmodel_file in the common template file
regmodel_sub_block   replaced by reg_access_block_type in the interface template file
<top-level-register-block-classname> must be the class name of the top-level uvm_reg_block in the register model.
<register-model-filename> must be the name of the file containing the register model, relative to the directory in which the script is run. If this parameter is omitted, the filename defaults to regmodel.sv.
<register-sub-block-classname> must be the class name of a uvm_reg_block in the register model associated with a specific agent.
<instance/agent-name> must be the variable name of that specific sub-block in the top-level register block class. Furthermore, that variable name must be the name of the agent associated with the particular register sub-block.
In addition to the register template file, the interface template file for each agent must specify the mapping between the specific variables of the transaction and the kind, address, and data required for the generic register access.
If an agent is associated with a register block, agent_has_env must NOT be set to no. In other words, the register block associated with an agent must be instantiated in an env dedicated to that specific agent. You can combine agents that have a register block with agents that don't, and provided the agents with a register block each have their own env, there is no restriction on whether the remaining agents have agent_has_env = yes or no.
Back to the top.
Common Template File
In addition to the interface template files listed on the command line, there must be a single common template file which contains all the code generator settings that do not relate to a specific agent/interface. The common template file is named common.tpl by default, though a different filename may be selected using the -m command line flag.
There is one mandatory setting, dut_top:
dut_top = <name>
dut_top must be the SystemVerilog module name (not the instance name) of the top-level module of the DUT.
The remaining settings are all optional:
dut_source_path = <path>
dut_source_path specifies the path to a directory that contains the DUT files. The path must be specified relative to the directory from which the script is run. The script recursively copies the contents of the directory <dut_source_path> into the directory <project>/dut so that the script works on a copy of the DUT files rather than the files themselves. This directory may contain a file named files.f which, if it exists, must contain any SystemVerilog source file names and command line flags necessary to compile the DUT, but should not refer to files from the UVM base class library itself (since these will be included in the automatically generated compilation scripts). If files.f does not exist, the generator will create a files.f that lists all the files in the DUT directory with the extension .sv in alphabetical order. The user must provide a files.f if the source files need to be compiled in anything other than alphabetical order or if any of the source files are not located directly within the DUT directory. If dut_source_path is not specified, the default is dut.
inc_path = <path>
inc_path specifies the path to a directory that may contain files that contain fragments of user-defined code to be included in the generated code. (This capability was greatly enhanced in the 2015-06 release.) The path must be specified relative to the directory from which the script is run. The script copies the files from the directory <inc_path> into the directory <project>/tb/include so that it works on a copy of the include files rather than the files themselves. Any files referenced by nested `include directives will not be copied to the <project>/tb/include directory. If the include files exist their filenames must be specified using the appropriate template settings in the interface and common template files, such as driver_inc_inside_class. If inc_path is not specified, the default is include.
The include files within the inc_path directory may by organised into subdirectories. The corresponding settings would then include a relative path name, for example:
driver_inc  = bus1/bus1_do_drive.sv  inline
monitor_inc = bus1/bus1_do_mon.sv    inline
dut_pfile = <path>
dut_pfile specifies the path of the DUT pin list file (see below). The default value is pinlist.
prefix = <prefix>
prefix, if present, specifies the prefix used when constructing the names of the files, module, package, and UVM classes associated with the top-level verification environment. The value specified here in the common template file can be overridden using the -p switch on the command line. The default value is top.
project = <project>
project, if present, specifies the name of the <project> directory, which will be created below the current directory and must be given as a simple directory name, not a path. All the files generated by the script are contained in or below the <project> directory. The default value is generated_tb.
dut_iname = <instance_name>
dut_iname, if present, specifies the instance name of the generated DUT module instance in the test bench module, which will be in the file <project>/tb/<top>_tb/sv/<top>_tb.sv. The default value is uut.
copyright = <text>
name      = <text>
email     = <text>
tel       = <text>
dept      = <text>
company   = <text>
year      = <text>
version   = <text>
The copyright text, the name, email, tel, dept, and company of the author, the year and the version, if present, specify text fields that will be inserted within the automatically generated file header at the top of every file. Every file header will be identical with the exception of an automatically generated filename and description contained therein.
generate_file_header = <yes or no> [2016-02-15]
If no, suppresses the generation of the automatically generated file header that includes the text fields specified above.
file_header_inc = <filename> [2016-02-15]
Include user-defined boilerplate code from the given file at the top of every file immediately before the automatically generated file header. The file header text is always inlined (no `include). It is possible to have an automatically generated file header, a user-defined file header, neither, or both. If you want the header text to be substantially different in each file, use the *_inc_before_class settings instead.
timeunit        = <integer><unit>
timeprecision   = <integer><unit>
timeunit and timeprecision specify the values of SystemVerilog timeunit and timeprecision declarations to be included in the generated SystemVereilog modules. If none are specified, the defaults are 1ns/1ps.
backup = <yes or no>
backup specifies whether or not to make a backup of any existing project directory before overwriting it with a new project directory of the same name. The backup directory has the filename extension .bak. The default is yes.
comments_at_include_locations = <yes or no>
Specifies whether or not to generate comments that show the locations at which user-defined code may be inserted using settings in the template files and comments that show where automatically generated code can be suppressed. The default is yes.
common_pkg      = <filename>
common_env_pkg  = <filename>
common_pkg, if present, specifies the name of a file that must contain a package declaration. The file must be in the dut_source_path directory. The filename need not match the package name. The common package will be visible to the DUT and the entire UVM environment, meaning that the common package will be compiled first and package import declarations placed in the generated code.
common_env_pkg, if present, specifies the name of a file that must contain a package declaration. The file must be in the inc_path directory. The filename need not match the package name. The common env package will be visible to the entire UVM environment, meaning that the common env package will be compiled first and package import declarations placed in the generated code, but will not be visible to the DUT.
If present, these two packages will be the first two packages imported by every package in the automatically generated code. Thus, in the absence of forward typedefs, they cannot contain references to automatically generated classes. There can only be one common package and one common env package.
regmodel_file = <filename>
regmodel_file, if present, specifies the name of the file containing the register model, relative to the directory in which the script is run. If this parameter is omitted, the filename defaults to regmodel.sv. (This setting has the same effect as regmodel_file in reg.tpl.)
top_reg_block_type = <classname>
top_reg_block_type, if present, specifies the type of the top-level uvm_reg_block class in the register model. This is used by the code generator as the type of the top-level regmodel variables in the top-level env and top-level virtual sequence. This setting is mandatory if a register model is required. (This setting has the same effect as regmodel_name in reg.tpl.)
nested_config_objects = <yes or no> [2016-02-19]
Specifies whether or not to generate nested configuration objects, that is, have references to the agent configuration objects within the top-level configuration object. The default is no for backward compatibility with earlier versions of the code generator.
If yes (recommended), the top-level configuration object contains references to the agent configuration objects. The top-level configuration object is instantiated from the top-level module, and the agent configuration objects are instantiated from the constructor (new) of the top-level configuration object. This approach has the benefit that there is no need to replicate or copy information between the top-level and agent configuration objects, the top-level configuration object can include constraints that reference variables contained within the agent configuration objects, and variables in any of the configuration objects can be assigned from the top-level module or the test class as well as from the top-level env class. By default, the generated top-level configuration object contains nothing but references to the agent configuration objects.
If no (the default), the top-level configuration object is separate from the agent configuration objects. This approach has the feature that the agent configuration objects are entirely encapsulated within the top-level env class, while the top-level module and the test class can only see the top-level configuration object. The top-level configuration object is instantiated from the top-level module, and the agent configuration objects are instantiated from the top-level env class. The top-level env class is responsible for creating and initializing the agent configuration objects based on information from the top-level configuration object. The variables that are generated by default within each agent configuration class are replicated in the top-level configuration class and are copied across from the top-level configuration to the agent configuration objects in the build_phase method of the top-level env class.
config_var      = <declaration>
config_var      = <declaration>
...
Each config_var declaration will be included in the generated top-level configuration class. Each <declaration> can be a complete class property (variable) declaration, a typedef, a constraint, or a comment. config_var can also be used in the interface template file to add declarations to the individual agent configuration classes. See agent_copy_config_vars.
The following settings enable or suppress the automatic generation of certain code inside or immediately after the corresponding class or module. The default is yes in every case. Suppressing the automatic generation of methods allows those methods to be user-defined.
th_generate_clock_and_reset = <yes or no>
If no, suppresses the generation of the clock and reset declarations and assignments in the test harness module <project>/tb/<top>_tb/sv/<top>_th.sv. These declarations and assignments rely on the if_clock and if_reset settings in the interface template file. If there exist multiple clocks then every clock will be generated with the same period and duty cycle, and similarly for resets.
top_env_generate_methods_inside_class    = <yes or no>
top_env_generate_methods_after_class     = <yes or no>
If no, suppresses the generation of the build_phase, connect_phase, and run_phase methods of the top-level env class.
top_env_generate_run_phase = <yes or no> [2016-02-15]
If no, suppresses the generation of the run_phase method only of the top-level env class. The build_phase and connect_phase will still be generated unless top_env_generate_methods_inside/after_class are also specified.
top_env_generate_end_of_elaboration = <yes or no>
If no, suppresses the generation of the end_of_elaboration_phase method of the top-level env class. The generated method prints out the verbosity threshold, topology, and factory overrides to help you debug the verification environment.
top_env_config_generate_methods_inside_class = <yes or no>                  [2016-02-19]
top_env_config_generate_methods_after_class  = <yes or no>
If no, suppresses the generation of the new method of the top-level configuration (uvm_object) class. If no, you must provide a constructor in an include file using the setting top_env_config_inc_inside_class and/or top_env_config_inc_after_class.
test_generate_methods_inside_class       = <yes or no>
test_generate_methods_after_class        = <yes or no>
If no, suppresses the generation of the build_phase method of the test class.
The following settings specify the names of include files for inserting user-defined code within automatically generated code. Each setting does nothing except insert some code, so these settings can be freely combined with other settings. By default, each setting generates one `include directive. If inline is given as a second parameter, the user-defined code is copied inline instead of being included using an `include directive. With or without inline, the included files are copied to the <project>/tb/include directory. Any files referenced by nested `include directives will not be copied to the <project>/tb/include directory.
th_inc_inside_module = <filename> [inline]
Include user-defined code from the given file before the DUT instantiation in the generated test harness module <project>/tb/<top>_tb/sv/<top>_th.sv.
tb_inc_inside_module = <filename> [inline]
Include user-defined code from the given file in the generated top-level test bench module <project>/tb/<top>_tb/sv/<top>_tb.sv.
tb_prepend_to_initial = <filename> [inline] [2016-04-18]
Include user-defined code from the given file at the top of (inside) the generated initial block that calls run_test() in the generated top-level test bench module <project>/tb/<top>_tb/sv/<top>_tb.sv.
tb_inc_before_run_test = <filename> [inline] [2016-04-18]
Include user-defined code from the given file inside the generated initial block immediately before the call to run_test() in the top-level test bench module <project>/tb/<top>_tb/sv/<top>_tb.sv. tb_inc_before_run_test can be used to assign variables within a configuration object from the top-level module, such as when setting a virtual interface to refer to a user-defined interface instance (see generate_interface_instance). Aside from virtual interfaces, variables within configuration objects are often best set from a test (see test_prepend_to_build_phase).
tb_generate_run_test = <yes or no> [2016-02-19]
If no, suppresses the generation of the initial block that calls run_test() in the generated top-level test bench module <project>/tb/<top>_tb/sv/<top>_tb.sv. You can then use tb_inc_inside_module to provide your own top-level configuration object and your own call to run_test().
test_inc_before_class            = <filename> [inline]
test_inc_inside_class            = <filename> [inline]
test_inc_after_class             = <filename> [inline]
Include user-defined code from the given file in the generated test class.
test_prepend_to_build_phase      = <filename> [inline]
test_append_to_build_phase       = <filename> [inline]
Include user-defined code from the given file in the build_phase method of the generated test class. Requires test_generate_methods_after_class = yes (which is the default).
top_env_inc_before_class         = <filename> [inline]
top_env_inc_inside_class         = <filename> [inline]
top_env_inc_after_class          = <filename> [inline]
Include user-defined code from the given file in the generated top-level env class.
top_env_prepend_to_build_phase   = <filename> [inline]
top_env_append_to_build_phase    = <filename> [inline]
top_env_append_to_connect_phase  = <filename> [inline]
top_env_append_to_run_phase      = <filename> [inline]
Include user-defined code from the given file in the build_phase, connect_phase, or run_phase methods of the generated top-level env class. Requires top_env_generate_methods_after_class = yes (which is the default).
top_env_config_inc_before_class  = <filename> [inline]
top_env_config_inc_inside_class  = <filename> [inline]
top_env_config_inc_after_class   = <filename> [inline]
Include user-defined code from the given file in the generated top-level configuration class (not the agent configuration class, which can be controlled from the interface template file).
top_env_config_append_to_new = <filename> [inline]
Include user-defined code from the given file in the new method of the generated top-level configuration class. The inserted code could be used to initialize variables in the top-level configuration class that were specified using config_var, for example.
top_seq_inc = <filename> [inline]
Include user-defined code from the given file at the end of the file <top>_seq_lib.sv that contains <top>_default_seq.
top_factory_set = <original-classname> <replacement-classname>
Generates a call to set_type_override in the build_phase method of the <top>_test class. Can be used with top_seq_inc to replace a default sequence with a user-defined sequence. top_factory_set and agent_factory_set have identical behavior since both do a factory overrride by type.
top_default_seq_count = <integer> [2015-11]
Specifies the value of the repeat count used in the top-level default virtual sequence to determine how many times the lower level sequences are started. This is a convenience setting that is only relevant if the top-level default virtual sequence is actually used to demonstrate or pipe-clean the generated code. This setting is irrelevant if the top-level default virtual sequence is replaced with a user-defined sequence using a factory override. The default value is 1.
uvm_cmdline = <flag> <flag> <flag> ... [2015-11]
Specifies a list of flags that are passed as simulator command line arguments to the UVM command line processor. Multiple flags should be separated by spaces.
Example
uvm_cmdline = +UVM_VERBOSITY=UVM_HIGH +UVM_OBJECTION_TRACE
Back to the top.
Common Template File - Reference Model and Scoreboard
The code generator can create one or more reference models each associated with its own instance of the Syosil UVM Scoreboard. Each reference model receives transactions from certain agents and sends transactions to its scoreboard. Each scoreboard receives transactions that represent the expected behavior of the DUT from its reference model, and also receives transactions that represent the actual behavior of the DUT from certain agents. The source code for the Syosil UVM Scoreboard itself must be downloaded separately from www.syosil.com. See the documentation that accompanies the Syosil UVM Scoreboard for further details.
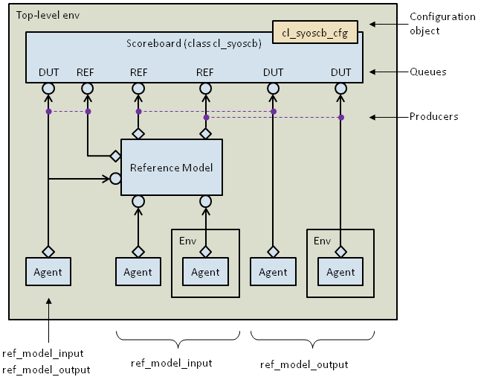
Figure: Reference Model and Scoreboard
The predefined compare methods of the scoreboard compare two transactions that originate from the same producer, a transaction from the "DUT" queue that represents the actual response and a transaction from the "REF" queue that represents the expected response.
The reference model and scoreboard are controlled by settings in the Common Template File as follows:
syosil_scoreboard_src_path = <path> [2015-11]
syosil_scoreboard_src_path specifies the path to the directory that contains the source files for the Syosil UVM Scoreboard. The path must be specified relative to the directory from which the script is run. This directory is named ./src within the distribution files, which you can download from www.syosil.com. The Easier UVM Code Generator has been tested with version 1.0.2.5 of the Syosil UVM Scoreboard, and hopefully will work with this and later versions. This setting is necessary if and only if you use the settings that follow to instantiate a reference model and scoreboard.
ref_model_input = <ref_model> <agent_instance_name> [2015-11]
ref_model_input specifies an agent that sends transactions to an input (technically a uvm_analysis_imp) of the reference model. A reference model can have any number of inputs. <ref_model> is a tag that identifies a particular reference model and is used as the root for the instance names of the reference model, scoreboard, and associated components within the top-level env in the generated code. You can have any number of reference models. Each reference model will be associated with one Syosil UVM Scoreboard. All settings in the common template file that refer to a particular reference model and the associated scoreboard must have the same tag. <agent_instance_name> must be the name of a SystemVerilog variable that holds a reference to a UVM agent object. It may be a hierarchical object reference, that is, it may include dot characters in order that it may refer to an agent instantiated its own env (using the setting agent_has_env = yes). The analysis port of the given agent will be connected to an analysis export (of type uvm_analysis_imp) of the reference model in the generated code.
ref_model_output = <ref_model> <agent_instance_name> [2015-11]
ref_model_output specifies an agent that sends analysis transactions to the scoreboard that reflect the actual output from the DUT. A reference model can have any number of outputs. The scoreboard compares the transactions from the given agent (the "DUT" queue within the Syosil UVM Scoreboard) with the expected transactions that are output from the reference model (the "REF" queue). In other words, the given agent instance is not really an output of the reference model but rather is an output from the DUT with which the reference model will be compared by the scoreboard. The analysis port of the given agent will be connected to an analysis export of the scoreboard and a corresponding analysis port of the reference model will be connected to a second analysis export of the scoreboard in the generated code.
The same <agent_instance_name> may be used as both a ref_model_input and a ref_model_output for the same reference model, in which case the stream of analysis transactions that form one of the inputs to the reference model are also passed directly to the scoreboard where they represent the actual outputs from the DUT (the "DUT" queue). The reference model will create its own stream of analysis transactions which will also be passed to the scoreboard for comparison (the "REF" queue).
ref_model_inc_before_class = <ref_model> <filename> [inline]                 [2015-11]
ref_model_inc_inside_class = <ref_model> <filename> [inline]                 [2015-11]
ref_model_inc_after_class  = <ref_model> <filename> [inline]                 [2015-11]
Include user-defined code from the given files in the reference model identified by the given <ref_model> tag. ref_model_inc_after_class must include a file that defines the extern function void write... methods associated with the uvm_analysis_imp exports that are automatically generated as part of the reference model, one write method per export. For example:
function void <ref_model>::write_<ref_model>_0(<tx_type> t);
  ...
endfunction
Note that the analysis exports and the analysis ports of the reference model are both numbered with an _N suffix that counts up from 0. The easiest way to get to grips with this is to inspect the generated code for the reference model before attempting to write your own user-defined code fragments.
ref_model_compare_method = <ref_model> <io or iop or ooo> [2015-11]
ref_model_compare_method specifies the compare method used by the given instance of the scoreboard. The Syosil UVM Scoreboard comes with three predefined compare methods, In Order (io), In Order by Producer (iop), and Out of Order (ooo), or you could define your own compare method. Different scoreboard instances can use different compare methods. The compare methods are set using factory overrides in the generated code. If and when new compare methods are added, you should be able to select a new compare method by adjusting the value of this setting, assuming that the new comparison class follows the same naming convention as the existing three comparison classes (e.g. cl_syoscb_compare_ooo).
Back to the top.
Common Template File - Acceleration/Emulation-Ready Environments
There are three settings, dual_top, split_transactors, and agent_inc_inside_bfm relevant to generating acceleration/emulation-ready environments in which the "HDL domain" that instantiates the DUT can be synthesized onto an accelerator or emulator box while the "HVL domain" that instantiates the UVM environment is strictly untimed, that is, does not contain any delays or clocks.
dual_top = <yes or no> [2016-01-21]
dual_top creates two top-level modules rather than instantiating the test harness module below the top-level test bench module. The default is no.
split_transactors = <yes or no> [2016-01-21]
split_transactors expects each transactor (driver and monitor) to be split across the HVL and HDL domains. The default is no.
split_transactors does the following:
- Forces dual_top = yes.
- Instantiates an additional interface in the test harness for each agent. This interface is intended to be used as a synthesizable BFM (Bus Functional Model) to drive and monitor the pins of the DUT.
- Sets the virtual interfaces in the UVM environment to point to these BFMs as opposed to the pin-level interfaces.
agent_inc_inside_bfm = <filename> [inline] [2016-01-21]
Include user-defined code from the given file in the generated BFM, which is a SystemVerilog interface.
To find out how to use split_transactors to create acceleration-ready environments, see Tutorial Part 5.
Back to the top.
Pin List File
The pin list file (given by dut_pfile in the common template file) is a text file that contains the DUT pin list, which is used by the generator to determine the connections between the ports of the DUT module instance and the variables of the test bench. The text file itself has the following format:
DEC = <variable_declaration>
DEC = <variable_declaration>
...
PAR = <parameter_name> <parameter_value>
PAR = <parameter_name> <parameter_value>
...
!<interface_name>
<dut_port_name> <variable_name>
<dut_port_name> <variable_name>
...
!<interface_name>
// Connections for a specific interface
<dut_port_name> <variable_name>
<dut_port_name> <variable_name>
...
!
// Ports connected to local variables
<dut_port_name> <variable_name>
<dut_port_name> <variable_name>
...
<variable_declaration> must be a complete variable declaration, including the semicolon, e.g. logic [7:0] data;
<parameter_name> is the name of a SystemVerilog parameter to the DUT module instantiation.
<parameter_value> is the default value of a SystemVerilog parameter to the DUT module instantiation.
<interface_name> may be the name of a SystemVerilog interface or an interface instance name (see below).
<dut_port_name> must be the name of a port on the DUT.
<variable_name> must be the name of the corresponding variable in the SystemVerilog interface that is to be connected to that DUT port.
DEC is used to specify local variable declarations, which will be included in the generated code before the DUT module instantiation and may be connected to ports of the DUT in the list following ! or !none. In other words, ! or !none are used to specify connections between DUT ports and locally-declared variables, as opposed to connections between DUT ports and variables declared in an interface.
PAR is used to specify parameters to the generated module instantiation statement. Each parameter must be given a default value.
SystemVerilog one-line comments (//, but not /* */) anywhere in the list will be copied verbatim into the generated code and can be used, for example, to indicate that a group of port connections are associated with a particular interface. Any line starting with a # character is treated as a regular comment and will be ignored.
An interface name generally takes the form <agent>_if. If number_of_instances is greater than 1, multiple instances of the same interface can be distinguished by adding the suffix _0, _1, _2, ... to the interface name in the pin list file. If number_of_instances = 1, the _0 suffix is optional in the pinlist file (though it will appear in the generated code).
If generate_interface_instance = no the interface name should be the user-defined interface instance name (regardless of number_of_instances). [2016-04-18]
Back to the top.
Generated Structure
Viewed as a diagram, the set of generated modules, interfaces, and classes is as follows. For each interface template file there is an interface and all the classes associated with an agent, including a configuration object and a sequence. If agent_has_env = yes or the agent has a register model, each agent would be instantiated in its own env, and the env would have its own associated virtual sequence (see below).
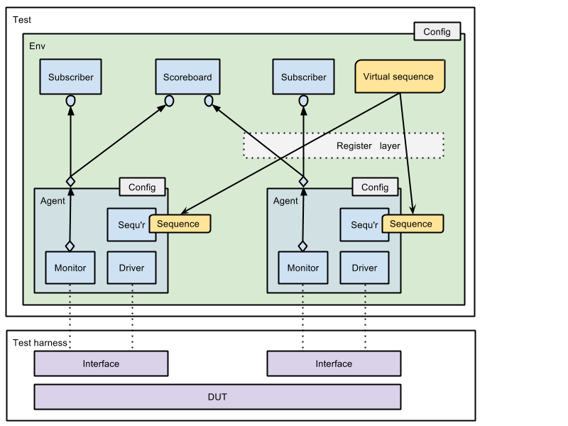
Figure: The Set of Generated "Things"
The generated file structure is as follows:
<project>/dut                                        Copy of DUT directory

<project>/tb/<agent>/sv/<agent>_<trans>.sv           Per-interface/agent
                        <agent>_if.sv
                        <agent>_config.sv
                        <agent>_driver.sv
                        <agent>_monitor.sv
                        <agent>_sequencer.sv
                        <agent>_agent.sv
                        <agent>_coverage.sv
                        <agent>_seq_lib.sv           Sequences
                        <agent>_package.sv           Package

                        <agent>_env.sv               If agent_has_env = yes
                        <agent>_env_seq_lib.sv       If agent_has_env = yes

<project>/tb/<agent>_env/sv/reg2<agent>_adapter.sv   If agent uses a regmodel
                            <agent>_env_coverage.sv  If agent uses a regmodel
                            <agent>_env.sv           If agent uses a regmodel
                            <agent>_env_seq_lib.sv   If agent uses a regmodel
                            <agent>_env_package.sv   If agent uses a regmodel

<project>/tb/<top>/sv/<top>_config.sv                Top-level env
                      <top>_env.sv
                      <top>_seq_lib.sv
                      <top>_package.sv

<project>/tb/<top>_test/sv/<top>_test.sv             Test
                           <top>_test_package.sv

<project>/tb/<top>_tb/sv/<top>_tb.sv                 Modules
                         <top>_th.sv

<project>/tb/include                                 Copy of user-defined include files

<project>/sim                                        Simulation scripts
Given two interface templates, no register model, and agent_has_env = no for each agent, the structure of the generated code would be as follows:
testbench (module)
 ↳ test harness (module)
   ↳ interface1 (interface instance)
     interface2 (interface instance)
     DUT (module instance)

 ↳ top_config (object)
   test (object)
      top_env
       ↳ config1
         agent1
          ↳ sequencer1
            driver1
            monitor1
         coverage1

       ↳ config2
         agent2
          ↳ sequencer2
            driver2
            monitor2
         coverage2

       ↳ top_virtual_seq (created in run_phase)
          ↳ agent1_seq
             ↳ transaction1
          ↳ agent2_seq
             ↳ transaction2
Given two interface templates, no register model, and agent_has_env = yes for each agent, the structure of the generated code would be as follows:
testbench (module)
 ↳ test harness (module)
   ↳ interface1 (interface instance)
     interface2 (interface instance)
     DUT (module instance)

 ↳ top_config (object)
   test (object)
      top_env
       ↳ config1
         env1
          ↳ agent1
             ↳ sequencer1
               driver1
               monitor1
            coverage1

       ↳ config2
         env2
          ↳ agent2
             ↳ sequencer1
               driver2
               monitor2
            coverage2

       ↳ top_virtual_seq (created in run_phase)
          ↳ env1_virtual_seq
             ↳ agent1_seq
                ↳ transaction1
          ↳ env2_virtual_seq
             ↳ agent2_seq
                ↳ transaction2
Given three interface templates, two with a register model and agent_has_env = yes, one with no register model and agent_has_env = no, the structure of the generated code would be as follows:
testbench (module)
 ↳ test harness (module)
   ↳ interface1 (interface instance)
     interface2 (interface instance)
     interface3 (interface instance)
     DUT (module instance)

 ↳ top_config (object)
   test (object)
      top_env
       ↳ register_model

       ↳ env_config1
         env1
          ↳ config1
            agent1
             ↳ sequencer1
               driver1
               monitor1
            coverage1
            adapter1
            predictor1

       ↳ env_config2
         env2
          ↳ config2
            agent2
             ↳ sequencer2
               driver2
               monitor2
            coverage2
            adapter2
            predictor2

       ↳ config3
         agent3
          ↳ sequencer3
            driver3
            monitor3
         coverage3

       ↳ top_virtual_seq (created in run_phase)
          ↳ env1_virtual_register_seq
            env2_virtual_register_seq
            agent3_seq
             ↳ transaction3
Back to the top.
Compilation and Simulation
Having run the code generator successfully, you can then run a simulation as follows:
Cadence:
cd <project>/sim
./compile_ius.sh
Mentor:
cd <project>/sim
vsim -c -do "do compile_questa.do; run -all"
Synopsys:
cd <project>/sim
./compile_vcs.sh
Aldec:
cd <project>/sim
vsimsa -do compile_riviera.do
The code generator creates an env that runs a simple sequence on each agent to generate one transaction per-agent. In the early stages of experimenting with the code generator, you could extend this sequence to generate more than one transaction and to consume some simulation time by editing the following SystemVerilog source file. (A better solution in the long run would be to set a factory override from a new test.)
<project>/tb/<top>/sv/<top>_env.sv
<top>_env starts a single top-level virtual sequence which starts a sequence on each agent. How this is accomplished depends on the settings in the template file for that agent. With agent_has env = no, the top-level virtual sequence starts a sequence on the agent. With agent_has env = yes, the top-level virtual sequence starts a virtual sequence associated with the <agent>_env, which in turn starts a non-virtual sequence on the agent.
The top-level virtual sequence starts child sequences, one per agent, using code of the following form in the file <top>_seq_lib.sv:
repeat (m_seq_count)
begin
  ...
  fork
    m_<agent1>_env_seq.start(null, this);
    m_<agent2>_env_seq.start(null, this);
    m_<agent3>_env_seq.start(null, this);
    ...
  join
end
As a result, the child sequences will run in lock-step, with all sequences finishing before the next round of sequences are started. In running initial simulations using the generated code, you can either set the value of the variable vseq.m_seq_count in the <top>_env::run_phase task to some number of transactions greater than one, or override the child sequences running on the agents to generate multiple transactions, or both. (In any case, this code is only intended as an example to get you started, and you are expected to override these sequences as you develop your tests.)
Back to the top.
Adding a User-Defined Sequence
A sequence <agent>_default_seq is generated for each agent. This default sequence executes a single transaction. The idea is that you can create your own user-defined sequences by extending <agent>_default_seq and add a factory override to the test to replace <agent>_default_seq with your sequence. If agent_has_env = yes, the <agent>_env has an <agent>_env_default_seq that starts the <agent>_default_seq.
You can specify the name and location of a user-defined sequence and a factory override in the interface template file:
agent_seq_inc     = <sequence-include-filename>
agent_factory_set = <original-classname>  <replacement-classname>

agent_env_seq_inc = <sequence-include-filename>
agent_factory_set = <original-classname>  <replacement-classname>
<sequence-include-filename> must be the name of a file in the <inc_path> directory (see above).
<original-classname> must be the name of the sequence to be overridden.
<replacement-classname> must be the name of the extended sequence.
With agent_seq_inc, the include file should contain a class that extends class <agent>_default_seq.
With agent_env_seq_inc, the include file should contain a class that extends class <agent>_env_default_seq.
agent_factory_set generates a factory override that replaces the default sequence with the user-defined sequence.
Back to the top.
Adding a User-Defined Register Sequence
You can also specify the name and location of a user-defined register sequence in the interface template file:
reg_seq_inc       = <register-sequence-include-filename>
agent_factory_set = <original-classname>  <replacement-classname>
<register-sequence-include-filename> must be the name of a file in the <inc_path> directory (see above).
<original-classname> must be <agent>_env_default_seq in this particular case.
<replacement-classname> must be the name of the extended sequence in this particular case.
The included file should contain a class that extends class <agent>_env_default_seq. agent_factory_set generates a factory override that replaces <agent>_env_default_seq with the user-defined sequence.
Back to the top.
Clocks and Resets
The top-level test bench <top>_tb instantiates the DUT within a test harness module named <top>_th, calls run_test to run the UVM test, and sets virtual interfaces in the configuration database. The test harness module instantiates the DUT and by default contains example code to generate the clock and reset signals. If if_clock and if_reset ports are specified in the interface template files, then these ports will be connected to the clock and reset signals, respectively, of the test harness. You will most likely want to modify the clock and reset generation code in the test harness according to the details of your DUT interfaces. This can be done by setting the th_generate_clock_and_reset = no and th_inc_inside_module variables in the common template file and supplying an include file to replace the automatically generated code. The test bench and test harness are generated in the following files:
<project>/tb/<top>_tb/sv/<top>_tb.sv
<project>/tb/<top>_tb/sv/<top>_th.sv
Back to the top.
Making Minimal Extensions to the Generated Code
In order to have the verification environment send signals to the DUT, you can provide the code executed by the run_phase tasks of each of the UVM drivers. To avoid having to modify the generated source code, you can provide code fragments to be included in the drivers in the <inc_path> directory. You must set the value of driver_inc in the interface template file to the name of the include file, and also make a single if_clock setting in the same template file. driver_inc relies on the name of the clock given by the if_clock setting. You must ensure that the included filename does not clash with the name of any generated file. The code fragment in the include file must follow the following pattern:
task <agent_name>_driver::do_drive();
  // This is an example. Do whatever you need to do to drive the pins of the interface.

  // The transaction is named req
  // The virtual interface variable is named vif
  // The signal names are from the .tpl file for the particular interface

  // vif.cmd <= req.cmd;
  // vif.addr <= req.addr;
  // vif.wdata <= req.data;
  // @(posedge vif.clock);
endtask
In order to have the verification environment monitor the pins of the DUT interfaces, you can provide the code for the run_phase tasks of each of the UVM monitors. To avoid having to modify the generated source code, you can provide code fragments to be included in the monitors in the <inc_path> directory. You must set the value of monitor_inc in the interface template file to the name of the include file. You must ensure that the included filename does not clash with the name of any generated file. The code fragment in the include file must follow the following pattern:
task <agent_name>_monitor::do_mon();
  // This is an example. Do whatever you need to do to monitor the pins of the interface.

  // This task is expected to contain an infinite loop
  // The virtual interface variable is named vif
  // The signal names are from the .tpl file for the particular interface
  // The analysis transaction is named m_trans
  // The analysis port is named analysis_port

  // forever @(negedge vif.clock)
  // begin
  //   m_trans.cmd  = vif.cmd;
  //   m_trans.addr = vif.addr;
  //   m_trans.data = vif.wdata;
  //   analysis_port.write(m_trans);
  // end
endtask
In order to have the verification environment collect coverage information, you can provide the code for the coverpoints for each of the coverage collector component, which is a UVM subscriber. To avoid having to modify the generated source code, you can provide a code fragment for a covergroup to be included in the coverage collectors in the <inc_path> directory. It is possible to include a run_phase task, for example to raise an objection until some coverage goal is met. You must set the value of reg_cover_inc or agent_cover_inc in the interface template file to the name of the include file, reg_cover_inc if the agent is associated with a register block, or agent_cover_inc if it is not. In either case, the file will be included in the covergroup of a coverage collector component connected to the agent. You must ensure that the included filename does not clash with the name of any generated file. The code fragment in the include file must follow the following pattern:
// The covergroup must be named m_cov
// The transaction received by the subscriber is named m_item

covergroup m_cov;
  option.per_instance = 1;

  // This is an example. Provide whatever coverpoints you need.
  cp_cmd:  coverpoint m_item.cmd;
  cp_addr: coverpoint m_item.addr;
  cp_data: coverpoint m_item.data {
    bins zero = {0};
    bins one  = {1};
    bins negative = { [-128:-1] };
    bins positive = { [1:127] };
    option.at_least = 16;
  }
endgroup
The behaviour of reg_cover_inc has been changed to match that of agent_cover_inc, that is, the include file should contain an entire covergroup named m_cov. For backward compatibility with template files from earlier versions of the code generator, it is still possible for the reg_cover_inc include file to contain only the coverpoints.
Back to the top.
Rules for Minimal Include Files
There are a couple of quirks, depending on which class we are talking about:
- The analysis port of the monitor is instantiated in new rather than in build_phase. This contravenes the coding guidelines, but has the advantage that the user can provide their own build_phase method in the include file.
- The subscriber (and only the subscriber) does not provide a new method. This allows the user to provide their own new method to instantiate a covergroup where needed (this is necessary because SystemVerilog requires covergroups to be instantiated in new).
With driver_inc specified, a default run_phase method is generated that calls do_drive, which you must overload in the include file. Otherwise you must define run_phase in the include file as specified by driver_inc_inside_class, either in-line or extern (in which case you would also need to specify driver_inc_after_class to provide the implemention of the extern method). It does not make much sense to specify an _after_class include file without also specifying the corresponding _inside_class include file. If you specify both driver_inc and driver_inc_inside_class, the latter could be used to provide methods called from do_drive.
With monitor_inc specified, a default run_phase method is generated that calls do_mon, which you must overload in the include file. Otherwise you must define run_phase in the include file as specified by monitor_inc_inside_class. Again, you may specify both monitor_inc and monitor_inc_inside_class.
With agent_cover_inc specified, you provide a covergroup in the include file. Otherwise, if you specify agent_cover_inc_inside_class, you provide the entire contents of the subscriber component, which may or may not include a covergroup. With neither specified, a default covergroup is generated together with the write method to sample that covergroup. agent_cover_inc and agent_cover_inc_inside_class are mutually exclusive.
Back to the top.
Including Code Before, Inside, and After Classes
While the approach described in the previous section allows you to extend the generated code by including user-defined code fragments, those code fragments must fit with the automatically generated run_phase and write methods. There is an alternative approach that allows you to replace the entire contents of the component classes including the phase methods and the write method where appropriate. This alternative approach requires you to provide more code but allows much more flexibility.
The alternative approach is to provide up to three include files per class, interface, or module (or in some cases even more). For example, the first file might be included before the class, the second inside the class, and the third after the class. You can put any syntactically valid code in these include files. The location of the included files is given by the inc_path setting of the common template file. You can have the generated code contain `include directives or you can have the user-defined code inserted inline in the generated code. With some classes you can also prepend and append code to certain phase methods (e.g. agent_append_to_build_phase). There are also settings to suppress the automatic generation of extern methods inside the class and the corresponding method definitions after the class, allowing the automatically generated methods to be replaced entirely by user-defined code, for example:
driver_generate_methods_inside_class = no
driver_generate_methods_after_class  = no
You can see the locations of all the include files in the generated code by setting
comments_at_include_locations = yes
in the common template file (the default). The automatically generated code for a driver class would then appear as follows (ignoring the conditional compilation guards for simplicity):
Filename my_driver.sv
// You can insert code here by setting driver_inc_before_class in file my.tpl

class my_driver extends uvm_driver #(my_tx);

  `uvm_component_utils(my_driver)

  virtual my_if vif;

  extern function new(string name, uvm_component parent);

  // You can insert code here by setting driver_inc_inside_class in file my.tpl

endclass : my_driver


function my_driver::new(string name, uvm_component parent);
  super.new(name, parent);
endfunction : new

// You can insert code here by setting driver_inc_after_class in file my.tpl
Back to the top.
Links
Easier UVM Coding Guidelines
Easier UVM - Deeper Explanations
Easier UVM Code Generator
Easier UVM Video Tutorial
Easier UVM Paper and Poster
Easier UVM Examples Ready-to-Run on EDA Playground
Back to the full list of UVM Resources